
How To Fix A Flat Tire On An Ebike?

Fixing a flat tire on an e-bike can be a bit of a pain, if you’ve already found yourself stuck with a flat tire, here’s how to fix it.
Before you get started you’ll need
1. A replacement tube
2. Tire levers
3. Inflator
4. A wrench (possibly)
1. Confirm your tire/tube size
The first thing you”ll need to know is the size of tire you have. That’s the overall circumference and the width of the tire. By identifying the width and diameter on the outside of your tire it won’t take much time before you realize what tube you need for fixing your flat e-bike tire. Tires typically will have a number on the outside, revibikes fat tire is “26*4.0”.

Here is going to be two major valves Presta valve which is skinny tall one and Schrader valve which is the shorter thicker one that you probably have on your car as well.

Presta valves are typically found on road bikes and modern mountain bikes. These valves require the core to be unscrewed before letting air in or out and come with a locking nut.
Schrader valves are shorter, and thicker than Presta valves and are nearly identical to the ones you’d find on a car. These valves are typically more common than Presta valves are in the e-bike space.
Fat tire bikes typically use the schrader valve which is pretty predominant on these ebikes.
2. Remove the wheel
The first thing you’re going to do when repairing a flat tube is remove the wheel, some tires have a quick release where you have the handle on there and you simply undo the handle and it will drop out. But bikes like Revibikes electirc bike have that axle bolted on so you need to loosen the nuts.
3. Remove the tire and tube
The first thing you do is to set the tire down in the area where you have the whole thing accessible. Then need tire lever, it doesn't cost you a lot, pretty easy to come by. Then you put the wheel right side up which drops the rim lower down, which can give you some slack that way it's a lot easier to put that over and you can notice there's enough slack you can actually able to put your finger in the tire. Use your tire lever and get that tire out of the bead all the way around like so then repeat on the other side rim drops down to the lower half of the tire. Then pry the tire off the bead, you can notice they've not connected anymore and that's a good sign you did that properly.
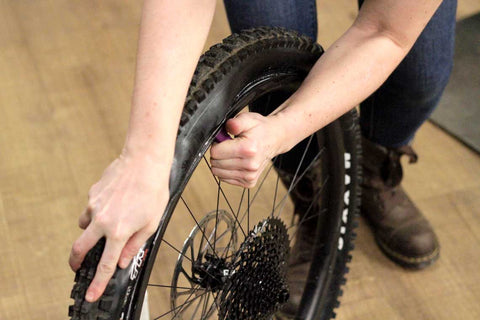
Set the wheel up in a way where you can push the tire lever up underneath the tire bead; then push the lever around the edge of the rim until the tire bead is no longer on the inside of the rim.
Repeat the process on the other side of the wheel, the tire will likely be even easier to remove from the rim.
4. Check the inside of the tire for thorns
Your old tube popped for a reason, so it’s important to check the inside of your tire to make sure there isn’t still a thorn or nail poking through. You don’t want to have to fix a flat e-bike tire twice. Carefully run your hand along the inside of the tire to remove any debris that may still be in there, and watch out that you don’t poke yourself!
You can also inflate the old tube to see where the puncture is, through some simple bike-detective work it will be easy to see if something punctured the tube, if it was a pinch flat, or if the tube split at the seam. By understanding what happened to the old tube you can better understand how to prevent the same thing happening with the new tube.
5. Put the tire back on the wheel (the right direction)
Once you’re done checking the inside of your tire is thorn free, it’s time to throw it back on the wheel. You’ll want to make sure that the tire is on in the correct direction too, if it’s on backwards it’s going to work but youre going to be rolling a lot slower than if it were on the right direction.
Hold the tire upright and drop the rim into the bottom of the tire, once the rim is fully inside the tire you can start to press the bead of the tire onto the inside of the rim. This is basically the opposite of what you were doing in Step 3, and tire levers still may be useful if you struggle to press the tire all the way onto the inside of the wheel.
6. Putting the tube inside the tire
Now you get your trusty tube which are pretty easy to come by at your local bike shop, if you don't have a lot of bike shops in your town, I am sure Walmart carries these same tubes as well. Before you put it in, you need to inflate it a bit so it has more shape and it molds to the inside of the tire a little better.
At this point you’ll put the tube inside the side of the tire you left off of the rim in Step 5, and press the valve down through the rims valve hole. Once the tube is inserted correctly inside the tire you can start to put the other side of the tire onto the rim.

It’s more than likely you’ll be able to push most of the tire onto the rim without tire levers, and I’d recommend doing as much of the tire as you can with your hands to avoid pinching the tube with the lever. Even when using your hands, be aware that pinching the tube between the rim and tire can happen.
Once both sides of the tire are on the rim, check both sides to make sure that they are mounted properly and there isn’t any tube sticking out. If everything is looking good it’s time to move on to the final step.
7. Inflating the tire, and putting the wheel back on
On the side of the tire it will most likely say the PSI range the tire will use. In short, that’s the pressure range for how much air that tire will hold. You should base your tire pressure on a couple of variables.
Rider Weight
Terrain Preference
Past experiences
Now that you’ve inflated your tire to the appropriate pressure, it’s time to put the wheel back onto the bike and get riding again. Make sure that your axle is tight, and that the wheel is spinning smoothly before riding.
Congratulations! You’ve successfully repaired your flat e-bike tire. And here’s to no flats in the future.